
A messy desk is more than an eyesore. Many people spend a third of their waking life within arm’s reach of a tangle of power cords, monitor cables, and charging bricks, and that mess quietly drains focus. The good news is that cable management is one of the cheapest upgrades a workspace can get. A few dollars of clips and ties often do more for a desk than a new chair. This guide walks through the ideas that genuinely work, the mistakes that waste money, and how to build a setup that stays clean months later.
Start by Unplugging Everything and Mapping the Mess
The most common mistake is buying organizers before understanding what needs organizing. A desk with one laptop and a lamp needs a different arrangement than a triple-monitor battlestation with a desktop tower, speakers, and a docking station.
The practical first step is to unplug everything, pull it all out, and lay the cables flat. Then sort them into three piles: cables that never move (monitor power, desk lamp), cables that move daily (phone charger, headphone cable), and cables that connect devices to each other (USB, HDMI, Ethernet). That sorting exercise determines almost every later decision.
While everything is unplugged, this is also the moment to dust. Cable clutter traps dust, and a clean surface under the desk makes the finished result last longer.
Route Cables Along the Desk Frame, Not Across It
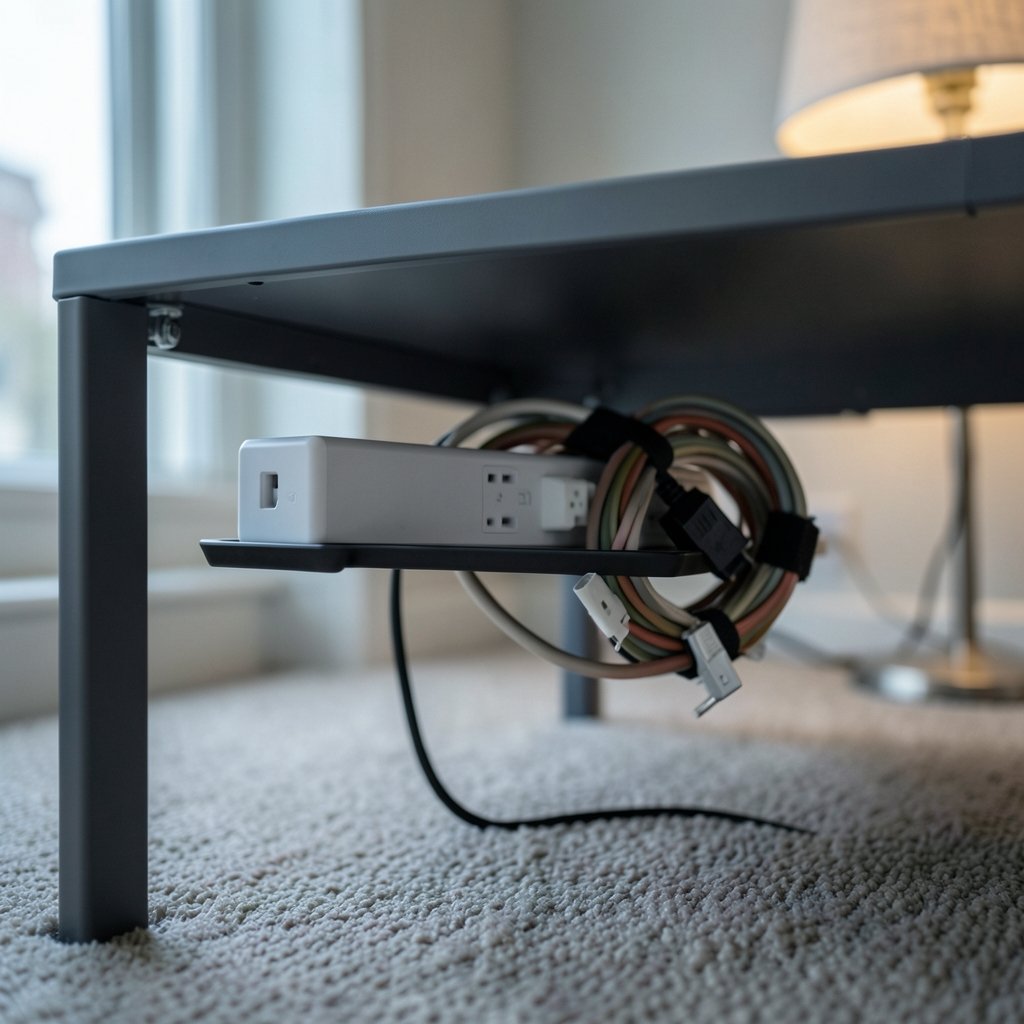
Cables draped across a desktop look chaotic because they cross the visual field. The fix is simple: run cables along the back edge or underside of the desk frame so they disappear from view.
Under-desk cable trays are the workhorse here. A tray screws or clamps to the underside of the desktop and holds power strips, adapters, and coiled slack. The result is that the floor stays clear and the desktop stays clean.
For desks that cannot be drilled, adhesive-backed trays and clips work well, though they hold less weight. Renters should lean toward clamp-on or adhesive options to avoid damaging furniture.
A useful rule of thumb: anything that plugs into the wall should live under the desk, and anything that plugs into a device should route up and over the back edge, never across the middle.
Choose the Right Fastener for the Job
Not all ties are equal, and using the wrong one is a common frustration. Here is how the main options compare.
| Fastener | Best for | Reusable | Notes |
|---|---|---|---|
| Hook-and-loop (Velcro-style) ties | Bundles that change often | Yes | Gentle on cables; the default choice |
| Zip ties | Permanent, hidden bundles | No | Can crush cables if overtightened |
| Adhesive cable clips | Single cables along a surface | Depends | Great for routing, weak on textured surfaces |
| Cable sleeves | Multiple cables on one run | Yes | Neat look; harder to add cables later |
| Spiral wrap | Long runs behind a desk | Yes | Protects cables from abrasion |
Hook-and-loop ties win for most desks because cables change constantly. Zip ties are fine for a bundle that will never move, but they should never be cinched tight enough to deform the cable jacket. That kind of pressure can damage internal wiring over time.
Adhesive clips are excellent for routing a single cable along a desk leg or wall, but they fail on textured, dusty, or oily surfaces. Cleaning the surface with rubbing alcohol before sticking a clip on makes a noticeable difference.
Consolidate Power With a Single Strip
One of the most effective ideas is also the least glamorous: replace scattered wall adapters with one surge-protected power strip mounted under the desk. This reduces the number of cords running to the wall and makes the whole setup easier to switch off.
Safety matters here. The U.S. Consumer Product Safety Commission has long warned about the hazards of overloaded circuits and damaged extension cords, and general office-safety guidance consistently flags daisy-chaining power strips and running cords across walkways as trip and fire risks. A strip that carries a recognized safety certification is worth the small extra cost. (Electrical Safety)
Mounting the strip to the underside of the desk, rather than leaving it on the floor, keeps it out of foot traffic and away from spills. Just leave enough slack so the strip can be reached without crawling underneath.
Create a Charging Station Away From the Main Workspace
Phone chargers are the most disruptive cables on most desks because they get moved constantly. A dedicated charging station solves this. A small dock, a multi-port USB hub, or a simple clip-on holder keeps charging cables in one predictable spot.
The trick that actually works in practice is to route the charging cable so it can be pulled out and retracted without dragging across the keyboard. A retractable cable or a weighted clip near the desk edge handles this well. Keeping chargers off the main work surface also means fewer cables competing for space with a mouse and keyboard.
Hide the Slack and the Cables
A tidy-looking setup often hides a surprising amount of cable. The secret is managing slack rather than eliminating it. Coil excess cable into a figure-eight or loose loop and secure it with a hook-and-loop tie, then tuck the coil into a tray or behind a monitor.
Never coil a cable tightly around a corner or bend it sharply. Tight bends stress the copper inside and are a common cause of intermittent connection problems. A generous loop is always safer than a tight wrap.
For monitor arms and adjustable standing desks, leave a service loop of cable near each moving joint. That loop absorbs motion so the cable does not pull tight when the desk rises. Standing-desk owners who skip this step often end up with frayed cables within a year.
Label Everything Before You Forget
Labels feel like overkill until the first time a device needs swapping. A small label maker or even masking tape and a marker turns a fifteen-minute troubleshooting session into a thirty-second one.
Label both ends of every cable, rather than only one end. The label at the device end tells you what it connects to; the label at the power end tells you which plug to pull. For anyone managing a home office with multiple computers, this is the single highest-value five minutes of the whole project.
The same logic applies to network gear. If a wired connection matters, choosing the right cable in the first place prevents future confusion. A guide to the best ethernet cable for gaming covers the categories and shielding that actually affect performance, which is more useful than guessing at the store. (Cable management)
Match the Setup to the Room
Cable management does not stop at the desk. Cords run to walls, floors, and nearby furniture, and a tidy desk with a chaotic floor still looks unfinished.
For a home office that doubles as a living space, cable raceways along the baseboard hide runs to the wall outlet. Floor cord covers protect cables in walkways and reduce trip hazards. If the workspace is part of a larger renovation, planning outlets and cable routes early saves a lot of improvisation later. Collections of home improvement ideas often include simple electrical and cable-routing upgrades that pay off in a home office.
Renters and anyone working in a shared space should favor removable solutions. Adhesive clips, clamp-on trays, and freestanding cable spines all come off cleanly when it is time to move.
Build a Setup That Scales With Your Gear
Desks change. A monitor gets added, a laptop gets replaced, a new peripheral arrives. Cable management that cannot absorb change gets abandoned within months.
The scalable approach is modular. Use hook-and-loop ties instead of zip ties. Choose trays with room to spare. Leave one or two empty ports on the power strip. Run a spare cable or two through the same sleeve as the active ones so future devices can be added without reopening the whole system.
This is the same principle that makes good tools worth using elsewhere. Teams that rely on project management software for teams tend to pick platforms that grow with the workload rather than locking them in. A desk setup benefits from the same forward thinking.
Common Mistakes That Undo Good Cable Management
Even well-planned setups fail for predictable reasons. Watching for these saves a second round of shopping.
- Buying organizers before measuring. Trays that are too shallow or too narrow get returned constantly.
- Over-tightening ties. Cables should be bundled, not strangled.
- Ignoring airflow. Blocking a laptop vent or a power brick with a cable bundle causes overheating.
- Skipping the floor. A clean desktop with a nest of cords underneath still reads as messy.
- No service loop on moving parts. Standing desks and monitor arms need slack at every joint.
- Forgetting the router or dock. These often sit on the floor and undo an otherwise tidy setup.
A Simple Weekend Plan
For anyone who wants a clean desk without a full redesign, this sequence works well.
- Unplug everything and sort cables into fixed, movable, and device-to-device groups.
- Measure the underside of the desk and the distance to the wall outlet.
- Mount a surge-protected power strip under the desk.
- Install a cable tray and route fixed cables into it.
- Bundle slack with hook-and-loop ties and tuck the coils out of sight.
- Clip movable charging cables to the desk edge.
- Label both ends of every cable.
- Add a floor cord cover for any run across a walkway.
Most people finish this in two to three hours. The payoff is a workspace that looks intentional and takes seconds to keep clean.
Conclusion
The best cable management ideas are not the most elaborate ones. They are the ones that match how a desk is actually used: a power strip mounted out of the way, a tray that hides the slack, hook-and-loop ties that forgive change, and labels that end the guessing game. None of it requires special skill, and most of it costs less than a single new peripheral.
The real test is not how a desk looks the day it is organized, but whether it still looks that way in six months. Setups built around removable fasteners, spare capacity, and sensible routing pass that test. Setups built on tight zip ties and hidden tangles do not. Start with the sorting step, buy fewer organizers than expected, and let the desk tell you what it needs. The result is a workspace that is calmer to sit at and easier to maintain, which is exactly what good cable management is for.
FAQ
How much does desk cable management cost?
Most basic setups cost under $40. A cable tray, a pack of hook-and-loop ties, a handful of adhesive clips, and a surge-protected power strip cover the majority of desks. Elaborate multi-monitor setups with sleeves and raceways can run higher, but the core items are inexpensive.
Do I need to drill into my desk?
No. Clamp-on trays, adhesive clips, and freestanding cable spines all work without drilling. Drilling gives the most secure result for heavy power strips, but renters and anyone with a valuable desktop should start with removable options.
Are zip ties bad for cables?
They are fine for permanent bundles but risky when overtightened. A zip tie cinched hard enough to dent the cable jacket can stress the internal wiring. Hook-and-loop ties are safer for anything that might change.
How do I manage cables on a standing desk?
Leave a service loop of slack near every moving joint, and route cables through a tray that moves with the desk rather than to a fixed point on the wall. Coil excess near the top of the leg so it expands and contracts cleanly as the desk rises and lowers.
What is the fastest way to hide cables without buying anything?
Bundle slack with twist ties or binder clips, route cables along the back edge of the desk, and tuck power bricks behind the monitor or under the desk. It is not permanent, but it takes ten minutes and noticeably reduces visual clutter.
How often should cable management be redone?
A quick check every six months is usually enough. New devices, moved furniture, and seasonal changes tend to introduce new cables. Relabeling and re-bundling during that check keeps the setup from slowly drifting back into a tangle.