
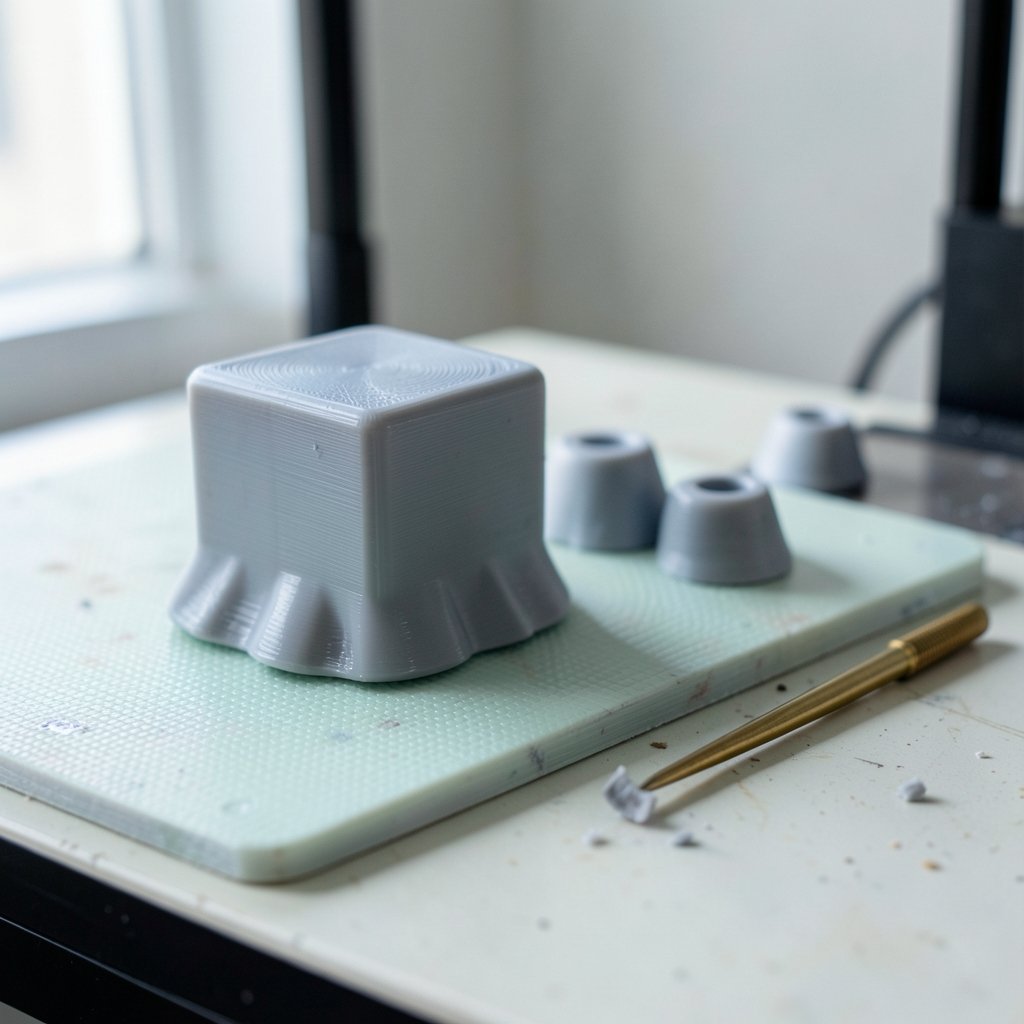
Does the bottom edge of every print coming off your printer look wider than the rest of the model, like it’s wearing tiny bell-bottom trousers? That flared base is called elephant foot, and it’s one of the most common first-layer problems in FDM printing. The good news: it’s also one of the most fixable. This guide walks through why it happens, what to change first, and which settings actually move the needle. (3D printing)
What Elephant Foot Actually Is
Elephant foot is a dimensional error, not a cosmetic quirk. The first few millimeters of a print bulge outward, so the base measures wider than the model’s intended footprint. On a part that needs to fit into a slot or sit flush against another surface, that bulge can mean the difference between a working assembly and a scrap bin.
The mechanism is straightforward. The nozzle lays down the first layer at a set height above the bed. If too much plastic is forced into that gap, it has nowhere to go but sideways. The same thing happens on layers two through five, just to a lesser degree, because the nozzle is still pressing softened material against a bed that’s holding it warm.
Why It Happens: The Four Real Causes
Most elephant foot traces back to one of four root causes. Diagnosing which one you’re dealing with saves hours of random tinkering.
1. The Nozzle Is Too Close to the Bed
This is the most common culprit by a wide margin. When the Z-offset is set too low, the first layer gets squashed. The slicer assumes a 0.2 mm gap, but if the nozzle is actually sitting at 0.12 mm, that extra plastic has to escape horizontally. The result is a squished, glossy first layer and a visible flare.
A quick test: peel the first layer off the bed. If it’s translucent, paper-thin, and hard to remove, the nozzle is too close.
2. First-Layer Over-Extrusion
Even with a perfect Z-offset, the slicer’s first-layer flow multiplier can push too much material. Many default profiles run first-layer extrusion at 100 percent or higher to improve adhesion. That extra volume has to go somewhere, and sideways is the only option.
3. Heat and Weight
The bottom layers stay soft longer than the rest of the print because they’re sitting against a heated bed. As the layers above accumulate, their weight pushes down on that still-warm plastic, encouraging it to spread. This is why elephant foot is worse on tall, heavy prints and on materials with low glass transition temperatures.
4. Bed Adhesion Compensation
Some slicers deliberately over-extrude the first layer to guarantee stick. It’s a reasonable trade-off for a decorative print and a terrible one for a mechanical part.
The Fix Order That Actually Works
Resist the urge to change five settings at once. Work through these in sequence, and re-test after each change with a simple 20 mm calibration cube.
Step 1: Dial In the Z-Offset
Raise the nozzle in small increments, typically 0.02 to 0.05 mm at a time, until the first layer is smooth and slightly matte rather than glossy and translucent. On printers with automatic bed leveling, this is usually a firmware setting. On manual printers, it means adjusting the bed screws or the Z endstop.
The sweet spot is a first layer that’s flat, has no gaps between extrusion lines, and releases from the bed with a gentle flex rather than a fight.
Step 2: Reduce First-Layer Flow
Drop the first-layer extrusion multiplier to somewhere between 90 and 95 percent. This is a slicer-side change and it’s fully reversible, so it’s a low-risk experiment. If adhesion suffers, nudge it back up in 2 percent steps.
Step 3: Enable Elephant Foot Compensation
Most modern slicers include a dedicated setting for exactly this problem. It shrinks the first layer’s footprint by a set amount so the bulge lands at the intended dimension. Typical values run from 0.1 to 0.3 mm. Start at 0.15 mm and measure the result with calipers.
| Slicer | Setting Name | Typical Starting Value |
|---|---|---|
| PrusaSlicer | Elephant foot compensation | 0.15 mm |
| Cura | Initial layer horizontal expansion | -0.1 to -0.2 mm |
| OrcaSlicer | Elephant foot compensation | 0.15 mm |
| Bambu Studio | Elephant foot compensation | 0.15 mm |
Note that Cura approaches it from the opposite direction: a negative horizontal expansion shrinks the first layer rather than compensating for a bulge.
Step 4: Add a Chamfer to the Model
If the part’s design allows it, adding a small chamfer to the bottom edge is the most robust fix of all. A 0.5 mm 45-degree chamfer gives the squished material somewhere to go that isn’t outward. It also eliminates the sharp corner that tends to curl. For functional parts, this is often better than fighting the slicer.
Step 5: Tune Bed Temperature and Cooling
Lowering the bed temperature by 5 to 10 degrees Celsius for the first few layers reduces how soft the base stays. Increasing part-cooling fan on layers two through five helps the material solidify before the weight above compresses it. Be careful with materials prone to warping, since aggressive early cooling can cause corners to lift.
Material Matters More Than You Think
The same settings behave very differently across filaments. A profile that eliminates elephant foot in PLA may cause adhesion failures in ABS.
| Material | Elephant Foot Tendency | Best Lever |
|---|---|---|
| PLA | Moderate | Z-offset and first-layer flow |
| PETG | High | Z-offset, plus a small gap |
| ABS/ASA | Moderate to high | Chamber temperature and cooling control |
| TPU | Low to moderate | Slow first-layer speed |
PETG is the notorious offender. It bonds so aggressively to smooth beds that printers often run the nozzle closer than ideal just to get consistent adhesion, which produces a pronounced flare. A textured sheet or a release agent lets you back the nozzle off without losing grip.
ABS and ASA bring a different problem: you can’t cool the first layers hard without risking layer separation and warping. Here, a chamfer in the model plus slicer compensation is usually the more reliable path than temperature tuning.
Common Mistakes That Make It Worse
A few habits reliably sabotage the fix.
Chasing the symptom with compensation only. Elephant foot compensation hides the bulge, but if the underlying cause is a badly calibrated Z-offset, the rest of the first layer is still wrong. Fix the root cause first, then use compensation as a final trim.
Changing Z-offset in large jumps. A 0.1 mm adjustment is enormous at first-layer scale. Move in 0.02 mm steps and print a small test each time.
Ignoring bed flatness. A warped bed means the Z-offset is correct in the center and wrong at the edges. If elephant foot appears on one side of the print but not the other, the bed itself is the problem, not the settings.
Testing on a large, complex model. Calibration cubes exist for a reason. A 20 mm cube prints in minutes and gives you a clean measurement.
Forgetting to dry the filament. Wet filament causes inconsistent extrusion, which reads as random over-extrusion on the first layer. If the flare varies from print to print with identical settings, moisture is worth ruling out.
When the Problem Isn’t Elephant Foot at All
Sometimes what looks like elephant foot is actually something else. First-layer squish from a genuinely unlevel bed produces a flare on one side only. Warping lifts corners and can create a lip that reads as a bulge. And over-extrusion across the whole print, with the base not the only affected area, points to an incorrect E-steps calibration rather than a first-layer issue.
Measure the flare with calipers. If the bulge is uniform around the entire perimeter and confined to the bottom 1 to 3 mm, it’s elephant foot. If it’s asymmetric or extends higher up the model, look elsewhere. (ASTM Committee F42 on Additive Manufacturing Technologies)
If you’re troubleshooting broader hardware and software issues alongside print quality, it helps to keep good reference material on hand. Guides on topics like how to fix antimalware service executable high cpu usage and how to fix a website that will not load follow the same diagnostic logic: isolate variables, change one thing at a time, and verify with a repeatable test.
Calibration Workflow Worth Repeating
Once the settings are dialed in, save them as a named profile. Elephant foot tends to return after a nozzle change, a bed surface swap, or a firmware update, because each of those shifts the effective Z-offset.
A simple quarterly routine keeps prints dimensionally accurate:
- Print a 20 mm single-wall cube and measure the base with calipers.
- Compare the base width to the mid-height width. Anything over 0.1 mm difference needs attention.
- Re-check the first layer visually for glossiness or translucency.
- Confirm the slicer’s compensation value still matches the measured error.
For anyone just getting started and still choosing hardware, understanding how a machine handles first-layer calibration matters more than raw specs. Resources like this guide to the best 3d printer for beginners often overlook first-layer tunability, which is exactly the feature that determines whether elephant foot is a five-minute fix or a weekend project. The same is true when comparing the best budget 3d printer options, since entry-level machines vary widely in how much Z-offset control they expose.
FAQ
How do I know if my Z-offset is too low?
Look at the first layer. A properly set Z-offset produces a smooth, slightly matte surface with extrusion lines that touch but don’t merge into a solid sheet. If the layer is glossy, translucent, or hard to peel off the bed, the nozzle is too close and elephant foot is likely.
Can I fix elephant foot without changing hardware?
Yes, in most cases. Slicer settings alone solve the majority of instances: reducing first-layer flow to 90–95 percent, enabling elephant foot compensation at around 0.15 mm, and adding a small chamfer to the model. Hardware adjustment is only needed when the Z-offset itself is off.
Why does elephant foot appear on some prints but not others?
It depends on the model’s base area and height. Wide, heavy prints put more weight on the soft bottom layers, so the bulge is more pronounced. Small, lightweight prints may show almost none even with imperfect settings. Bed position also matters if the bed isn’t flat.
Does elephant foot compensation affect dimensional accuracy elsewhere?
No. The setting only applies to the bottom layers, typically the first one to three. The rest of the model prints at its intended dimensions. Just verify with calipers that the compensation value matches the actual measured error rather than guessing.
Is elephant foot worse with PETG than PLA?
Generally yes. PETG bonds more aggressively to common bed surfaces, which pushes many users to run the nozzle closer than ideal. A textured build plate or a release agent lets you restore a proper Z-offset without losing adhesion, which reduces the flare considerably.
How much elephant foot is normal?
A small amount, roughly 0.05 to 0.1 mm of flare, is typical on most FDM printers and usually invisible. Anything beyond 0.1 mm on a calibrated machine is worth correcting, especially for parts that need to fit precisely.
Conclusion
Elephant foot looks like a stubborn hardware flaw, but it’s almost always a calibration issue with a clear cause. The nozzle sits too close, the first layer gets over-extruded, and the excess plastic spreads sideways because the warm bed keeps it soft. Work through the fixes in order: correct the Z-offset, trim first-layer flow, enable slicer compensation, and add a chamfer when the design allows it.
The part most people skip is measurement. Calipers turn a vague “it looks a bit flared” into a number you can act on, and that number tells you whether you’re dealing with elephant foot or something else entirely. Save the working profile, re-check it after any hardware change, and the problem becomes a minor maintenance task rather than a recurring frustration.



